September 20, 2010

Fall Wreath

Fall is here... sort of. I still feel the blistering hot weather, BUT I know the leaves are about to start changing, the temperatures are about to start dropping, and pumpkins are about to come out! So, that is why I am starting my fall crafts....

And, I do believe that you will be quite impressed with the price of this lovely wreath. It cost me somewhere around 4 bucks! You gotta love the dollar tree. <333


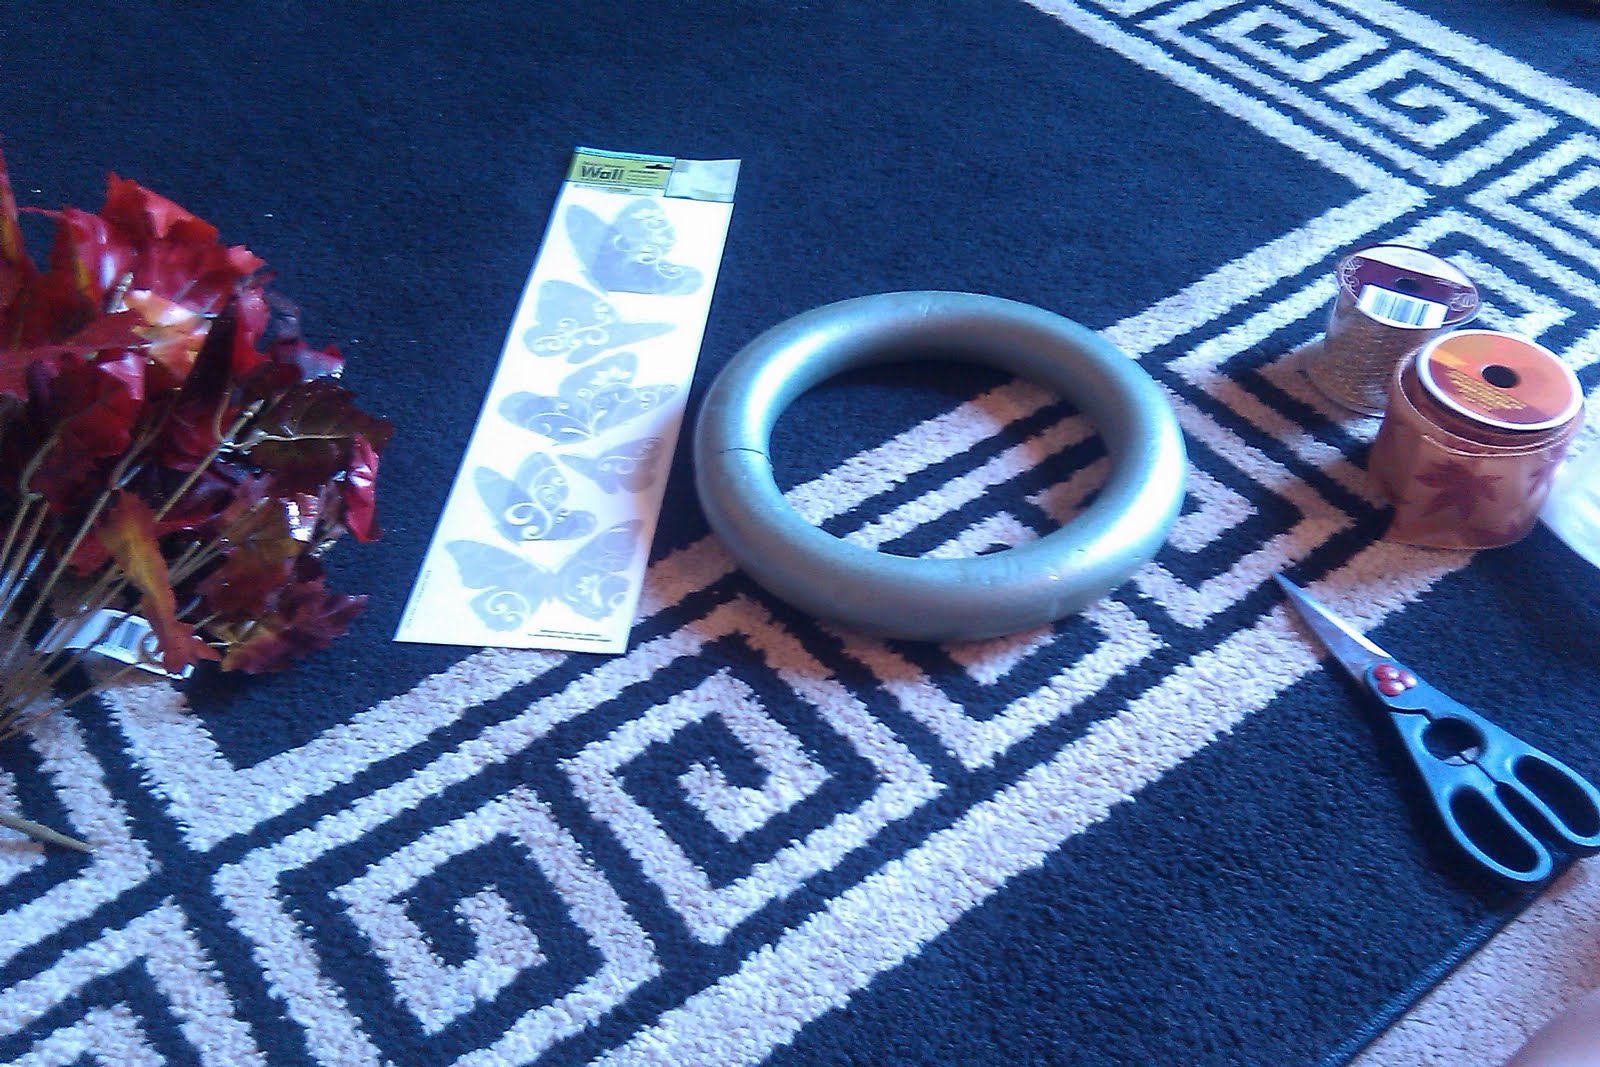
First, I just gathered my materials... for four bucks... from the dollar tree! A styrofoam wreath template, some various fall leaves, and two kinds of ribbon.
Next, I wrapped the wreath template with my pretty fall leaves ribbon. 
Keep in mind, all I'm doing is hot glueing this stuff. Simple, simple! Then, in groups of three leaves I started gluring little mini leaf groups together and positioning them on the wreath however they look best! Then, add your big piece of ribbon to attach it to your door. Finished!
 The dollar tree also treated me well by giving me some cute fall kitchen decor. Yay for today!! I am VERY happy!!! :)

September 18, 2010

Love Magnets

So, I wanted to jazz the refrigerator up a little bit. I have this odd obsession with magnets. I like to switch them out.... constantly. haha My friend Julie and I went to Hobby Lobby and grabbed some wooden letters, mod podge, and cute scrapbooking paper. All you do is cut the paper out to fit the wood blocks, mod podge it on there, then take some magnets and adhere them to the back! Simple, simple, simple!

I also stopped by a local thrift store, and bought a darling little knick knack to go in my living room bookshelf. Cute, right?


 1 Corinthians. "And now these three remain: faith, hope and love. But the greatest of these is love."

September 16, 2010

Cheesy Chicken Roll Ups... mmmmmm!

So, I have came across a super easy family meal that is to die for! This has managed to move its way to mine and my boyfriends TOP FIVE list! I'll give you the ingredients, instructions, etc. But, believe me you must must must try this!! It is just too good to pass up.

Cheesy Chicken Roll Up Shopping List:
1 can of Pillsbury Butter Tastin' Crescent Rolls
1 can of ... well... canned chicken!
1 can of Cream of Chicken with Herbs soup ( I have also made Cream of mushroom and it is great also!)
1 bag of Kraft Pizza Cheese Cheddar and Mozzarella Mix
1 soup can full of milk

First, you get a deep dish baking pan. Spray a little Pam cooking spray on it, and preheat your oven to 350.

Then, drain your chicken and mix in some cheese.
 Next, get out your crescent rolls, and place the chicken/cheese mixture on the big part of the triangle. Then, rolllll it on up!
After you do these steps... you want to place your rolls to the side. Next, you want to start creating your soup dish mixture. Heat a skillet on medium heat. Pour your soup and milk in there. Then, add a cup of cheese. Stir the mixture until the cheese has completly melted and there are no lumps in your soup.


After you soup mix is done, pour it into your deep dish pan.
Now, place your crescent rolls on top of this mixture. Stick them in the oven for 20-25 minutes or until golden brown.
Now, sprinkle the remaining cheese from the bag all over the top of your roll ups. Stick it back in the oven for about 3 minutes. Then, look at the yummy/ beautiful result! Mhmmmmm!!!!

Enjoy!

September 13, 2010

Rock Star Purse!

So, my Nana and I got together and made this super cute purse! To start off with, I gathered some pink and black material. I cut out 6 pieces of the purse sides. They were the same size. I also cut out two pieces of interfacing to match these sides. Next, I cut out two identical oval bottoms. I made two like interfacing pieces. Then, I ironed on all the pieces of the interfacing to the pieces of fabric. Of course, you iron it to the "wrong" side. 
 Then, I ironed the two sides of the purse together. You put the wrong sides together.
Then, you put the facing of the bag (the extra two pieces) pinned to the newly sewn bag. You sew the handles and top part of the bag together. This will hold everything in place. 
 Last, you want to flip the purse right side out. Take the bottom pieces and sew them together with wrong sides together. Then, take the bottom piece of the purse and pin it to the bottom of the bag. Last, sew it on! Your cute little rockstar purse is complete! haha

 Please excuse this last picture. I look a HOT mess. I'd been cleaning and crafting all day! 

September 11, 2010

Journaling is a must..

Well hello blogland! It's been a minute. I started school back- which takes a ridiculous amount of time away from me.However, mostly it has been due to the fact that I had some internet problems. BUT, good news! It is back up and running for good! So, yay for that!!! Anyways, I wanted to start the Crafter's Devotional.

Day One:
This article starts out with journaling. It suggests that writing alone helps you to see your aspirations, meet your wishes, capture your dreams, and see your potential It also helps to capture fears and insecurities. I choose to make an art journal for my journal. I incorporate "art" into journaling. And believe me, you do not need to be an artist. I can barely draw stick people. However, it is still fun. 

Francis Burney says...
"How truly does this journal contain my real and undisguised thoughts- I always write it according to the humor I am in, and if a stranger was to think it worth reading, how capricious- insolent and whimsical I must appear!- one moment flighty and half mad,- the next sad and melancholy. No matter! Its truth and simplicity are its sole recommendations.

So, like I said, I suck at drawing. However, here is my first attempt at art journaling. I am NOT claiming to have any artistic abilities. haha I just want to capture my feelings. :) Plus, my new craft book insists that this is a good thing. So, I guess I'm going to try it!


The text says," Close your eyes! Imagine... because you can't fear what you don't really know."

Last, I bought another really cool book today! It has to do with journaling and creativity. It's called ....
Wreck this journal! It was like 14 dollars with tax included at Barnes and Noble. Go check it out! Anyways, I'll talk to you all soon this time! No more internet problems... promise! Hope you all are doing well!!! 
I have a super cool purse tutorial coming soon!!! So, get excited! haha ;)

August 27, 2010

arts and crafts from the heart of asheville

So, I decided to take a trip to the lovely Asheville, North Carolina for a little arts and crafts inspiration. It was so fun! All kinds of local artists had their work displayed on shops, corners, stores, etc. They were showing and selling. I bought a few things, but mostly just got some awesome ideas. I thought I'd share some cool pics of things that would be cheap, easy, and fun to make. Enjoy!


Published with Blogger-droid v1.5.3.1

August 26, 2010

Crafter's Challenge at Live, Laugh, Craft

So, my book has arrived! I am absolutly thrilled, and I cannot wait to begin. I am starting a "challenge" here at Live, Laugh, Craft. I am linking to my button at the bottom of this post if you want to participate. I will post the entire post from the book daily for 365 days. Plus, some other cool stuff of course! The book is laid out in a really neat way. This is the same way that the "challenge" / blog hop will be set up.
Monday= Mixed Media Journaling (this is quite interesting, and artistic!)
Tuesday= Recycle, Reuse, or Revive
Wednesday= Collection, Stash, and Cool Art Materials
Thursday= Personal History/ Get to know YOU
Friday= NonCraft Inspiration
Saturday/Sunday= Collaborate, Gather, and Experiment with an awesome CRAFT!

If you want to join this AWESOME creative adventure with tons of tips, techniques, tricks, etc. then take the button below and put it anywhere on your site... then check back next Monday... when all the fun begins!!!!
Until then, I'll just be putting up some cool crafts and projects that I've been working on. Plus, some super cute pics from my 21st. (Thanks for all the sweet birthday comments :) )

Here is the button for the challenge/blog hop starting next Monday. :) You can grab it from the right side of the page too, and get the html code to add it to your site!!


Much love!

August 24, 2010

Happy Birthday to me!

Hey everyone! I'm taking a short break to celebrate my 21st bday today... soooo I will return to blogland tomorrow!!

Much love!

August 22, 2010

Inspire Me!

So, last night my friend and I embarked on an adventure to the bookstore for some crafting inspiration! I found soooo many cools things that I want to do or at least try to do this week! The stuff I found was just so awesome that I couldn't pass up sharing it with you guys! Let me know if you make anything on my countdown... I'd love to see it! :)

Beaded Candle Holder- This would be so cheap and easy to make! Personally, I think some pearls wrapped around this would look gorgeous. 

Book Flower Frame- I plan on making this craft this week! It is TOO CUTE. Love this idea. Plus, it would be really simple to make. 
Wire Crafts- Sommer and I attempted this last night. We made little flowers. It looks harder than it is for sure. We got some 19 gauge wire, and I think if we would have got a smaller gauge it would have went a lot smoother. However, these designs look simpler, so it shouldn't be too difficult to bend and twist!


Stenciled Plates- I love painting plates! This is simple, but so cute!

Recycled Magazine Trash Bin
Homemade Stationary- I actually folded some paper and glued it with a glue stick this morning to make some super cute envelopes. I got the idea out of a book. They are really easy and fun to personalize! 
Last, I stumbled upon this book that I MUST HAVE ASAP. It was like 25 dollars in the store, BUT I came home and did a little google search. I found out Amazon has them for like right under 10. Perfect! My copy is on the way... and I have BIG plans for this book. It's like 365 days of "challenges." 
Just thought I'd share what inspired my Sunday morning. :) Anything inspiring stumble its way upon you today?

August 21, 2010

Dresser Redo/ Craft Room Update!

Ok, so this is my dresser that I redid! I needed a little more room for craft supplies. The desk and closet were overcrowded, so I decided to give my ugly little dresser a little revamping. I like how it turned out! The before pictures are not so attractive. See...
So, I took the ugly little Walmart dresser outside to redo it. I cleaned it down with some VSP and water first to make sure that all the dust and glossy-ness was broken down. Then, I got these materials...

It is pretty hard to paint plaster board, so you need to make sure that the surface is extra clean. Otherwise, it will bubble up and peel off. Also, you need a really good primer. I took two coats to my little chest of drawers.
I let it dry about one hour between each coat of primer. It was a really hot day though, so the time may be different. About two hours later, I started the painting process. I put two coats of paint on, too. This dried overnight. Then, I took it in! I like how it turned out!
I thought the satin white color was a bit too bland, so I dressed it up with some cute flowers and laced ribbon all around the top edges. I started in the front (like pictures below) and just hot glued the lace ribbon all around the edges. I think this matched everything well. It also fit the crafty theme.

I filled the shelves with craft supplies and papers, etc. I also bough these super cute baskets for a couple dollars at Big Lots. I filled them with my most used craft supplies.

So, what do you think?